The email domain is the entire part of an email address that comes after the @ symbol. You can create a custom domain with your company's name to give more authenticity to your messages. This article will guide you through the steps to register and add a domain.
Before getting started, you need to have an active custom domain.
Email Configuration for Support Ticket Journey
For plans starting from Specialist, a subdomain @zenvia.email and an inbox are provided for importing emails related to the support ticket journey.
Configuration Steps:
Configure your custom domain: First, you need to configure your custom domain by following the instructions provided in this article.
Set up your custom email: Configure the email that will serve as the main inbox for support tickets in your email provider.
Create a redirect rule: In your email provider, create a rule to automatically redirect all emails received in this inbox to the inbox associated with the @zenvia.email subdomain.
The redirect ensures that all emails received in your domain are correctly processed and imported into Zenvia Customer Cloud, centralizing support tickets and keeping the support flow organized. Make sure the redirect rule is active and working properly to avoid losing important messages.
To add a domain:
Go to Settings > Channels > Email > Channel Settings > Register new domain;
Then, enter the domain name you want to create, for example, @yourcompany.com. After that, click on Next.
⚠️ Attention: It is not possible to use free domains such as @gmail, @yahoo, @hotmail, etc.
The entered domain needs to be authenticated, and to send and receive emails, you must register the DNS entries.
DNS Entries
DNS stands for Domain Name System. To work properly, the domain must be connected to a server via DNS entries. Each entry has a set of fields, which are:
Type: The type of record, with CNAME and TXT being used for email on Zenvia Customer Cloud;
Name: The root domain (e.g., zenvia.com) or subdomain;
TTL (Time to live): The frequency in seconds of the record’s update in the servers' memory. For example, changes in a record with a TTL of 3,600 seconds will be updated every hour.
Value: This information varies according to the type of record.
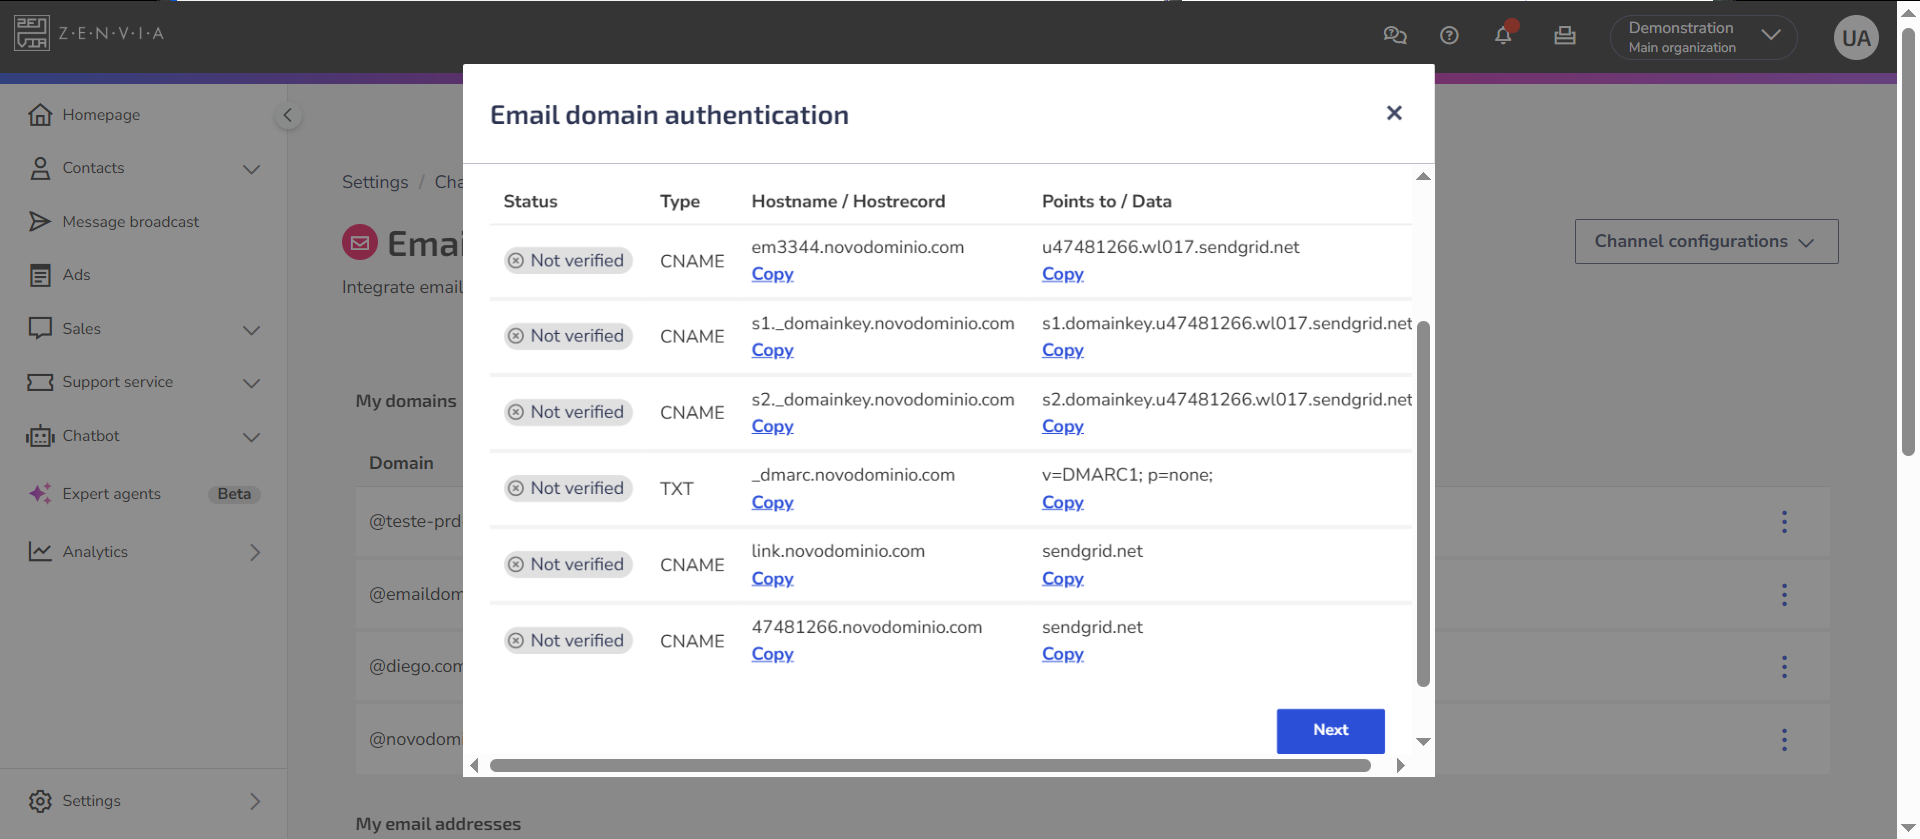
In Zenvia Customer Cloud, the email authentication process requires the creation of:
- Five (5) CNAME entries – Responsible for validating the use of the domain for sending messages.
- One (1) TXT entry (DMARC) – Essential to protect your domain against fraud and improve email deliverability.
Each of the entries must be validated with your provider for your domain to be authenticated. Below, we explain how this authentication is done.
Why configure DMARC?
DMARC (Domain-based Message Authentication, Reporting, and Conformance) is an email authentication protocol that helps protect domains from phishing and spoofing. It enhances the security and reputation of your domain by:
- Preventing email forgery – Prevents third parties from sending fraudulent emails on behalf of your company.
- Improving deliverability – Increases the chances of your emails reaching the recipients' inbox.
- Providing more security – Reduces the risk of phishing attacks against your clients and partners.
- Generating usage reports – Allows monitoring who is sending emails using your domain.
Domain Authentication
Copy each entry from the Zenvia Customer Cloud table and paste it into the corresponding field of your provider.
⚠️ Attention: The configuration of DNS entries is done differently with each domain provider. Check the Help Center of the most popular providers:
- GoDaddy: Manage DNS records.
- Hostinger: How to Manage DNS Records at Hostinger.
In summary, when copying the entry available in the Points to/Data column, you should paste it into the indicated field of the provider you chose to perform the authentication. For this reason, we suggest using two windows in your browser: one for Zenvia Customer Cloud and another for your provider’s page.
After completing the registration of each entry, click on Next.
All entries must be correctly validated. Otherwise, the domain authentication is not completed. In these cases, an error message will appear informing you that your validation was not completed, and you can redo it.
If you choose to validate at another time, you can find the domains in your email control panel. After adding the records, click on the three-dot menu of the domain with pending authentication and then on Validate.
⚠️ Attention: Validate the domains carefully, as it is not possible to change them later. If necessary, you can only delete the validated domain.
With your domain authenticated, you can add it to an email address. We'll explain how to add one or more emails to your domain.
Add an Email Address
To add an email to your domain, you must fill in the email address field linked to the domain, which is the address you use to send and receive emails. The other information is optional:
- Sender for outgoing messages: Name displayed in sent messages.
- Reply-to email: Email address that will receive the replies.
- Reply sender: Name displayed when a reply is sent to your email.
- Description: Field to add information or details about the sent email.
- Tracking options:
- Open tracking: Receive a status event when the message is opened.
- Click tracking: Receive a status event when a link in the message is clicked.
- To change the tracking options, click on Edit settings.
With the fields filled in, click Add email to finish.
For each registered email, you can Copy email, which means copying the registered email address, and also edit or delete the email by clicking the 
Done! Now you know how to register domains and add email addresses.
Need help with Zenvia Customer Cloud?
If you follow the instructions in this article and still have difficulties or questions related to Zenvia Customer Cloud, please contact our Support team directly. Check the step-by-step guide in the article: How to contact Zenvia Technical Support.