Creating a conversational flow is the process where you configure the chatbot to serve your customers.
In this article, you will find a detailed tutorial on how to design the bot’s structure in the Builder, using the available content to customize the interactions. Read carefully and use this material as a foundation to have autonomy and create any type of flow-based chatbot.
💡 Tip: Learn about all the possible content you can add to your chatbot’s flow in the article Adding content in the chatbot builder.
Starting to build the chatbot’s conversational flow
Access the Zenvia Customer Cloud.
Click on Chatbot > List of chatbots > Create new chatbot.
Click on Select in the Flow-based chatbot option.
Give a name to the chatbot in the indicated field.
Then, click on Blank > Create chatbot.
You will be directed to the chatbot’s Builder. Next, let’s understand how to create the flow.
Step 1: Defining the flow’s starting point
The first step is to set a block as the starting point, so the flow begins from a customer’s interaction:
Click on Add block in the bottom left corner of the builder.
In the Marker, set the tag as Start.
Write a greeting text defining an output: Click on Add content > Text message. Example: "Hello, I am a test chatbot!"
Step 2: Defining the flow’s continuation
The second step is to set the next destination, such as collecting the user’s name:
- Click on Add block.
- In the Block details
, give it a name, such as "Collect_name".
- Add a message asking for the user’s name:
- Click on Add content > Text message.
- Example: "Please, type your name."
- To capture the name, add a data input field: Click on Add content > Open field.
- Connect both blocks so the bot follows the flow correctly. Select the Start block > Click on Destination > In the Default destination field, direct it to the Collect_name block.
Now, the bot can collect the user’s name. You can customize the response message using variables.
Customizing the conversation with variables
Now that you’ve collected the user’s name, you can thank them and ask how you can help, addressing them by name using a Variable to personalize the message.
In the Collect_name block, click on Variables.
Select Fill variable and choose Name.
- Now, once the bot collects the name, it will be saved in the variable to use during the conversation or to pass it to a human agent if necessary.
💡 Tip: Always remember to click Save changes in the bottom left corner of the screen to avoid losing your progress.
Done! Your chatbot now sends a greeting and collects the user’s name. Shall we move forward?
Step 3: Connecting flows and proceeding with the communication
Now you can configure the bot to ask the user how it can help, addressing them by name.
Click on Add block.
In Block details
, define a name. It can be "Help."
Add a Text message content and insert the variable. Example: "How can I help, <?$name?>?"
Connect the two blocks so the bot understands that after receiving the name, it should ask how it can help: Select the Coleta_nome block > Click on Destination > Locate Default destination in the lower corner > Click the icon
and direct it to the Help block.
Step 4: Finalizing the flow with a closing block
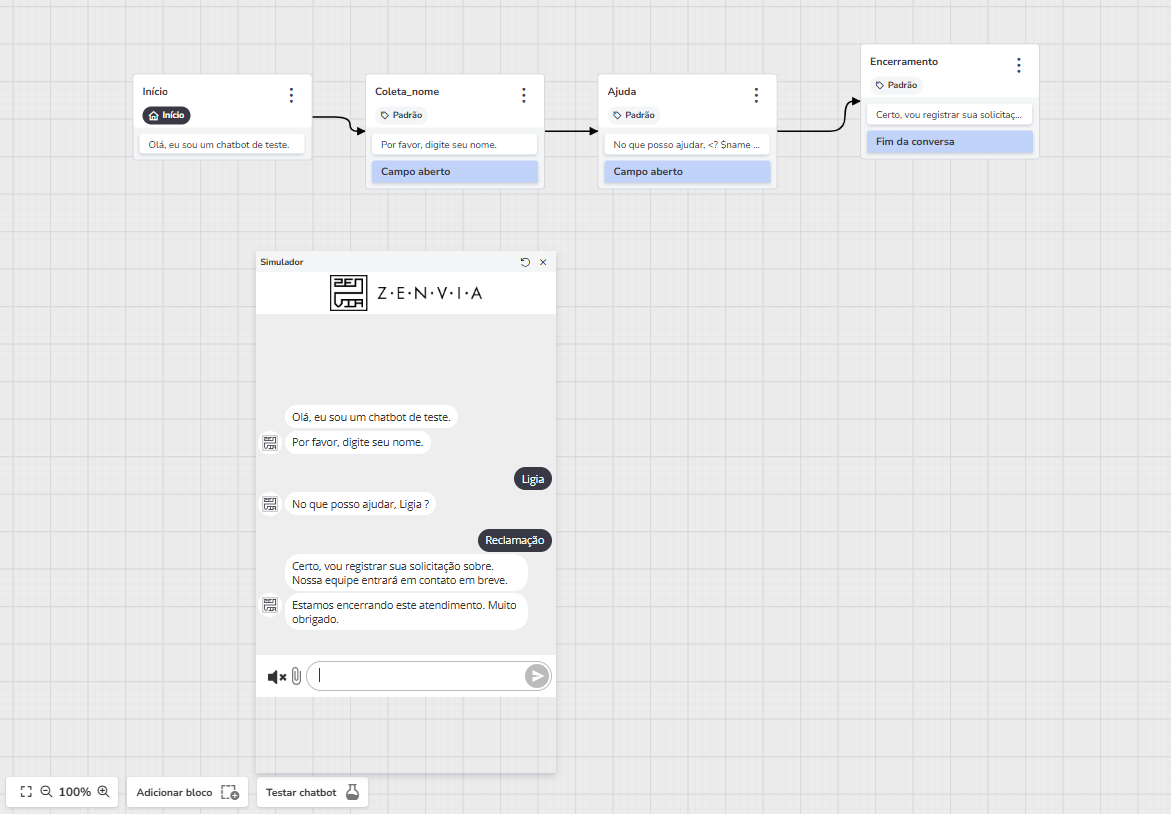
In the example of the scenario shown in the image below, in portuguese, we created a simple interaction that simulates a complete conversation with a beginning, middle, and end.
This approach demonstrates how the bot should interact logically and smoothly until the conversation ends.
Now, let’s see how to create the closing block.
It is essential to ensure that the user’s experience with the bot concludes and to avoid issues such as conversations that "reopen" automatically or leave the customer stuck in a dead-end flow.
Click Add block.
In Block details, set a name. It could be "Closing."
Add a Text message content. Example: "Alright, I’ll log your request. Our team will contact you soon."
End the chat by clicking Add content > Conversation actions > End conversation.
Enter the Closing text. Example: "We’re ending this session. Thank you very much."
Connect the blocks so the bot understands that, after asking how it can help and receiving the user’s message, it should close the conversation: Select the Help block > Click Destination > Locate Default destination in the lower corner > Click the icon
and link it to the Closing block.
💡 Tip: You can insert the End conversation action at any stage of the flow where you want the bot to conclude the conversation. For instance, if your bot’s flow has multiple response options or different paths, make sure to add the action to each of these paths to ensure all conversations are closed properly.
Step 5: Testing the flow so far
After completing the first three steps, click on Save changes > Test chatbot and check your progress so far.
Recommended articles:


